
- Buying a Van to Live in
- Turning a Van into a Home
- How to Build a Camper Van Interior
- Walls and Floor
- Van Plumbing System
- How to Build Out the Electrical System With Solar Panels In a Van
- How to Build a Kitchen Cabinet in a Van
- Shower and Toilets In Camper Van
- How to Build a Bed In a Van
- Dog Couch Bed
- Campervan Furniture
- Recommendations
OK, we were finally there. Ready for the journey called “van life” dreaming about our very first road trip. But before that… building a van home was a grandiose business ahead.
A lot of people dream about living on wheels but get stuck when stepping into the technical stage, having only basic ideas on how to build a van home. The point is, even if you do everything like an expert, it may take you much longer than initially anticipated before an actual adventure starts. A kind of test or quest, if you will. The good thing is that nothing can stop you if you are determined to chase your dream.
Buying a Van to Live in
From YouTube videos and e-books to online forums and chats, it seemed that death by information overload was more than real. When it comes to choosing and buying a van to live in, people have much to say. Here are some steps to take in order to stay on track:
- Do thorough research to collect topic-related materials
- Narrow down all the information you found
- Choose the type of vehicle you’re going for (camper, RV, cargo van, box truck, school bus, etc.)
- Focus on what matters most. Are you OK with parking in large parking lots like Walmart or, perhaps, your dream is getting closer to the wildest nature? Are you looking for cost-saving options or, maybe, money doesn’t matter?
Based on the answers to the above-mentioned questions, you’ll face an entirely varying community of people with different viewpoints on preparation for road life.
In other words, you have to choose. It’s not an all-in-one deal. Having it all is possible in a perfect world that, unfortunately, does not exist. Anyway, it was an easy choice for us. No hesitation, no regrets, no fear.
We ended up choosing a nice cargo van that used to move travelers’ suitcases around the Miami International Airport in its previous life. We were lucky to win an auction bid: a 3-year-old Ford Transit EcoBoost High Roof Base model with a clean title for $16,000 plus a $450 delivery fee from Miami. A bit of advice here, guys. As you get involved in the van-building adventure, don’t try to foresee all the troubles in advance. Face and combat each ‘enemy’ as it comes your way. It’s naïve yet surprisingly effective when mixed with just a little bit of passion, effort, and creativity.
Our auction purchase came with left rear damage which we ended up paying $6,000 to repair. Small victories? Of course, but very important to recognize and celebrate! The van came with the steel metal shelves that we sold locally for $600. Another win, let’s keep going.
Turning a Van into a Home
Purchasing a van is just half the battle. Turning it into a home is where the real fun begins. Since we were first-time van home builders, we created a detailed to-do list (Lilu is exceptionally good at it!) and stuck to it. We started with the exterior upgrade. Things we did and what others might want to focus on in the process:
- Before you jump into van conversion, find the right place to store all the tools and materials used in the process. In our case, we sacrificed our kitchen (sorry, Lilu!) and used it as dust storage.
- You should probably avoid the black color to line the van if you’ll be spending the majority of your time traveling in places like Arizona, South Texas, and Mexico (something we did later in our travels and learned the hard way).
- Go for the all-terrain tires to avoid being ambushed by deep sand somewhere in the desert or beach one day.
We are not sure how we would have handled the process without the amazing vanlifers Far Out Ride at https://faroutride.com/build-journal/. Not only have they put together a tremendously detailed how-to-build-a-van website, but they have also provided many links to valuable tools, products, tips, and tricks that saved the day more than once. If you run into roadblocks as part of your van build or simply wondering, “How much does it cost to build a van home?” their website has it all. Don’t hesitate to leave them a comment and tell them Z and Lilu sent you.
How to Build a Camper Van Interior
One of the most challenging yet exciting parts of the interior build is that the van structure is multilayered and quite complex. You will uncover many “reefs” when fully immersing yourself in the process. Quick tip? Don’t be afraid, just keep at it.
Your creativity will work magic.
An interior camper van design will certainly get you scratching your head. However, remember that you’re not alone in all of this. Keep in mind that, the van space is relatively small, which means there are limits that require simpler interior design rules.
Walls and Floor

One of the most essential ingredients in the van building process is insulation! In our case, the best go-to van insulation was at https://havelockwool.com/. Generously insulating the walls and the floor with their New Zealand wool was an essential step to protect our future home. It manages moisture, absorbs harmful chemicals (improving the air you breathe!), and reduces unwanted noise. Once we were done with the wool part, we covered it with birch plywood. Thus, we were relatively cool on the hot summer days while warm and cozy in the wintertime. Whatever materials are used in the process, waterproof and scratch-free floors are a must.
Good ventilation is crucial as well. Things you’ll most likely have to cut into your van: ventilation, windows, and skylight. Go slow! Use the masking tape to protect the paint on your vehicle and…please, measure a hundred times before cutting.
When making such permanent changes, keep your layout in mind; it will be difficult to fix those oversights. We installed two max air fans and two side windows which created a strong draft on hot sunny days (as a result, we don’t even need an AC!).
Van Plumbing System
Just like electricity, the water system is an important addition that can make or break your travel experience. Before going for anything, decide how many people will live in a van and how much water you all might need. We installed a tankless water heater, so taking a hot shower in the middle of a nightly desert was magical. If you think you’ll be using a lot of water on the road, opt for a larger water tank!
In general, for a solid water system, you’ll need a freshwater tank, a hose for plumbing, a pump, and a filtration system. Make sure to include the shut-off valve for both your water and electrical. This will make any future repairs to the van plumbing system more manageable.

How to Build Out the Electrical System With Solar Panels In a Van

Invest in a stable van electrical system since it’s an essential step to the self-reliance of your van. Before you get to it, answer a couple of important questions:
- How much power is needed?
- Do you need power for the fridge or any other appliances?
- How many electronics will be charged on a routine basis?
- How many light fixtures do you plan to set up?
Now that you have clear answers, purchase all the necessary components.
These might be summarized in the following list:
- An inverter.
- Batteries.
- Solar panels.
- A charge controller.
- Cables & fuses.
- Battery isolation switch, etc.
Here’s our story. To ensure that we would never run out of power, we bought 2 Tesla batteries which hold 150-amp hours each, and wired our two 175-watt each solar panels in parallel. We connected our electrical system to the van alternator, which provides a rapid charge for our Tesla batteries every time we drive. Pro tip here: always size up all the wires!
If you’re a beginner in the field of the solar system, get some help and guidance from this awesome guy Will Prowse (here), and choose what works perfectly for your new home on wheels.
How to Build a Kitchen Cabinet in a Van

No matter how modest your kitchen plans might be, decide where exactly all your appliances will go. Generally, the first step would be to build out a frame for the kitchen cabinets and counters and then cover it all with plywood.
When wondering how to organize a kitchen, consider your budget and preferences. We invested in a butcher’s block countertop. To make more room, we bought a sink that comes with a hardwood chopping board.
Shower and Toilets In Camper Van
During the designing process, it is vital to fit both the shower and the toilet in the camper van. We had running hot water for both an inside and an outdoor shower. We highly recommend having the ability to take a quick indoor shower when parked in a crowded parking lot and have the joy of taking a warm shower outside under the beautiful night sky. For the bathroom, we picked nature’s head toilet and never regretted it. Just a quick opening of the side slider cabinet under our stove provides access to the toilet.
We highly recommend using diatomaceous earth in and around your toilet to prevent nasty bugs. Put some moth balls in the vent pipes as well.

How to Build a Bed In a Van
Building your own camper van bed will depend on the type of sleeping space you prefer. Remember, you can always build a pop-up bed extension or have the whole bed space transform into a couch/living space.
Typically, the process includes the following steps:
- Choose the dimensions and plan your layout. Make sure your bed is properly supported with solid battens. Everything in your van will become looser and looser with time, so in all your build steps, make sure to support and screw everything down tightly.
- Use hinges.
- Add extension and cover.
- Pick the right mattress. Since the memory foam attracts moisture and can cause mold, we used a latex mattress/topper that we found here. We love it!
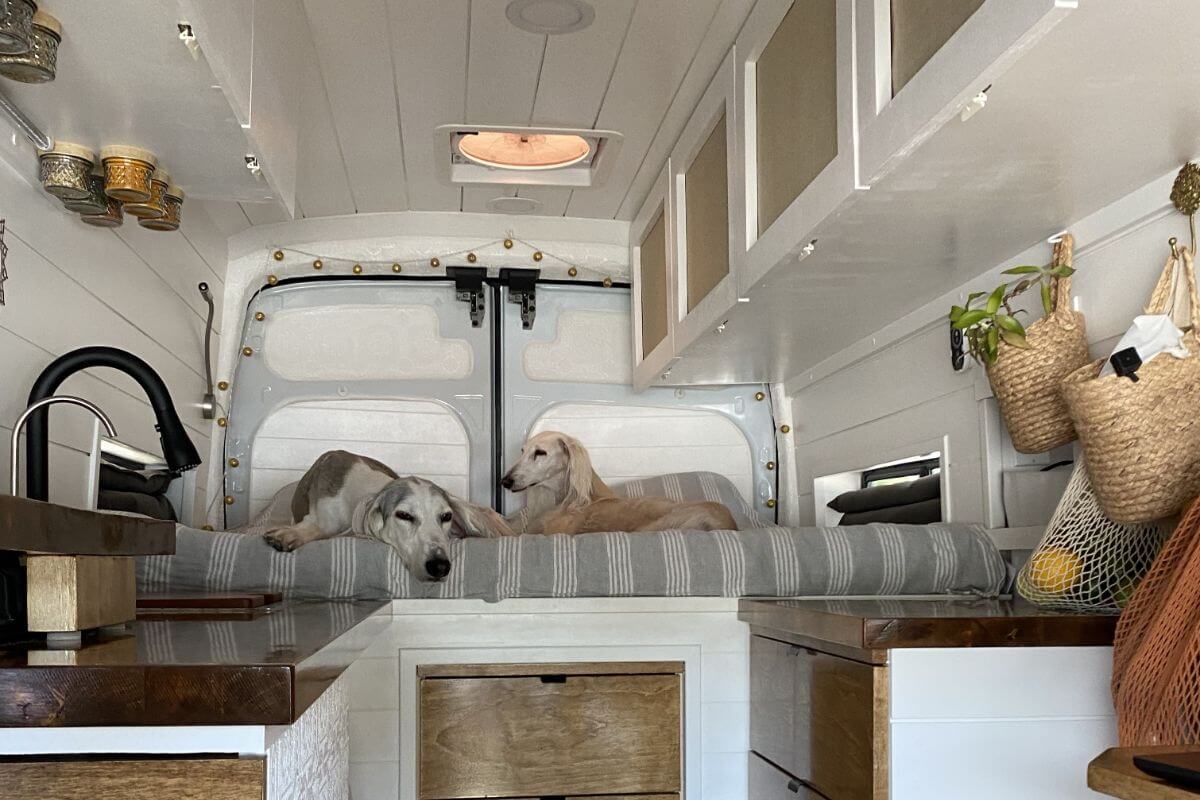
Dog Couch Bed
It may be self-explanatory, but one of the most important things in the van building process is to make each item and space as multi-function as possible. If you’re a dog person and a happy owner of a cute little thing like our Evie, ensure to provide enough room for them as well. If equipped with a properly thick cover and an extension, your bed can be easily converted into a cozy and spacious dog couch bed during the daytime.

Campervan Furniture
To add a home-like feeling to our van, we had to take care of the other furniture pieces. Here’s what we added to the above:
- In the so-called kitchen area, we built the slide-out drawer for our new fridge. These heavy duty drawer slides were just what we needed: https://amzn.to/3MuDX3f (Just make sure all the screws are flat heads so they do not interfere with the sliding capability and cause it to jam. Now we simply slide out our fridge under the couch with ease to keep it out of the way and have more room, as a result. We’ve also included a venting hole on the side with a 12 volt cooling fan: https://amzn.to/41bwHxq . We then placed a venting grille:https://amzn.to/3Mvv9KK. This whole setup ensures your fridge doesn’t overheat and works efficiently.
- We did some upgrades to the overhead storage to fit in more of our belongings.
- We installed swivel seats which we found at https://theswivelshop.com and are loving how both of our front seats turn and create an entirely different space.
- Overhead cabinets now store all of our essentials, while still keeping everything clean and organized. If you’re looking for ways to maximize storage space, feel free to set them up all the way lengthwise of the entire “room.”
- With lower kitchen cabinets, everything is clean, well-organized, and has a designated spot.
- The optimal use of every square inch in such a small place is a must and the under-bed space is no exception. A cozy sleeping spot on the top and adequate storage underneath.
- We found a nice 2-in-1 option for the kitchen dry storage: the jars stored right above the kitchen counter serve as a nice décor as well.

So, what is van life setup about?
Planning. You’ll save loads of precious time if you plan each step before working on it.
Accepting help. Not sure if you’re ready to tackle something yourself? Outsource it to an expert. There’s nothing wrong with approaching professionals!
Failing. It is always part of the road to success.
Dreaming. It’s your vision and your commitment that motivate you and help you make your dreams come true while the dream itself is underneath it all.
Recommendations
- We installed two *Maxxair fans and two side windows which created a strong draft on hot sunny days (as a result, we don’t even need an AC!) And you can experience the ultimate ventilation solution by purchasing yours here: https://amzn.to/3KJtZd3. We personally don't find a Maxxair fan with a remote necessary. In fact, we prefer to use the manual option, especially during freezing temperatures where the remote may not have enough power to push through icy snow.
- Before going for anything, decide how many people will live in a van and how much water you all might need. With two people and two dogs, we installed this tankless water heater: https://amzn.to/3UoSMqk which worked like a charm with no issues. Taking a hot shower in the middle of a nightly desert was really magical.
- In general, for a solid water system, you’ll need a freshwater tank, a hose for plumbing, a pump, filtration system, and an accumulator. By the way, this SHURflo accumulator worked fantastically for us: https://amzn.to/3GrViWV.
- An inverter (this is the one we have: https://amzn.to/40R654V. Not only was it capable of handling the electrical loads of our Vitamix and Instant Pot, but it did so with ease and gave us no trouble.
- Solar Panels (we bought two of these and never looked back: https://amzn.to/3GvZc0R).
- Cables and Fuses (here are the Solar Connectors that fit our solar panels:https://amzn.to/3nZRupy. We also needed these extension cables: https://amzn.to/3Uo7ZrF. It's important to protect the cables from weather damage, especially in the transition from exterior to interior; this fitting provides a great seal and a proper bend of cable without breaking. Waterproof Solar Cable cover:https://amzn.to/40UuRkX.
- Batteries (we bought two of these Tesla technology batteries and it’s the newer generation): https://amzn.to/3zHYWs3. They are reliable and perform exceptionally well below freezing temperatures.
- A charge controller with safety in mind to protect your batterieshttps://amzn.to/3mnK7ry. It’s also smart enough to change/switch between solar panels and alternator power.
- To make more room, we bought a sink that comes with a hardwood chopping board:https://amzn.to/3nTvUTv. This one’s really neat because you can have more working space by using the top board to cover the sink when it’s not in use. Also, this faucet fits perfectly to the whole sink set up : https://amzn.to/40XnetW, and don’t forget the handy soap dispenser:https://amzn.to/3KlUrZ6.
- For the bathroom, we picked nature’s head toilet and never regretted it: https://amzn.to/3GudLSP. If you’re on the fence about it, nature’s head toilet is the way to go and worth every penny.
- We highly recommend using diatomaceous earth in and around your toilet to prevent nasty bugs. This Diatomaceous Earth does the trick: https://amzn.to/3msLjcW. Do NOT inhale it when using. You can also place a few moth balls in the vent pipes for extra protection from the outside critters.
- Our overhead cabinets now house all of our essential items, keeping them clean and organized. For those seeking to optimize storage space, we recommend these breathable packing cubes: https://amzn.to/3MoSYno. They simplify the task of storing clothing, and make packing for air travel a breeze – simply place the cubes in your suitcase and you're ready to go.
- With lower kitchen cabinets, everything is clean, well-organized, and has a designated spot. These are brilliant for storing any extra items like fruits: https://amzn.to/40S6jsx. Just simply let them hang on a hook and you can also use them for grocery bags.
- We've found a practical solution for storing spices that not only frees up cabinet space, but also adds a unique touch to our kitchen. By using these mason jars: https://amzn.to/3o1GUOA we can easily store our spices right above the kitchen counter, providing easy access while also creating a stylish and functional display.


Leave a comment
All comments are moderated before being published.
This site is protected by hCaptcha and the hCaptcha Privacy Policy and Terms of Service apply.